Mixing and Mastering, Music Production
EQ Harsh Vocals + Compress/Add FX (EVERYTHING YOU NEED TO KNOW)

Introduction
Whether you want to EQ Harsh Vocals, trying to Compress your Vocals or need to Add FX to your music, this FULL GUIDE will give you EVERYTHING YOU NEED TO KNOW about it.
Harsh Vocals
• Definition
Harsh Vocals are the product of an imbalanced audio core which is the frequency range the human ear finds most sensitive, 2kHz – 5kHz. Balance in this range is key for producing mixes that resonate. Early digital recordings were notorious for harsh high frequencies.
Since then, digital technology has now developed to the point that newer gear should not produce any distortion in and of itself.
To begin, when EQing a vocal it is common to go overboard, make an error, and end up with an undesirable result.
Now, here’s a rundown of what to look for and how to get started:
- High Pass; any undesired low end noise should be removed.

- Use a sweeping EQ with a tight Q To uncover any stand frequencies or resonances and high gain.
Once the unwanted frequency is located you can reverse the gain to erase that annoyance.

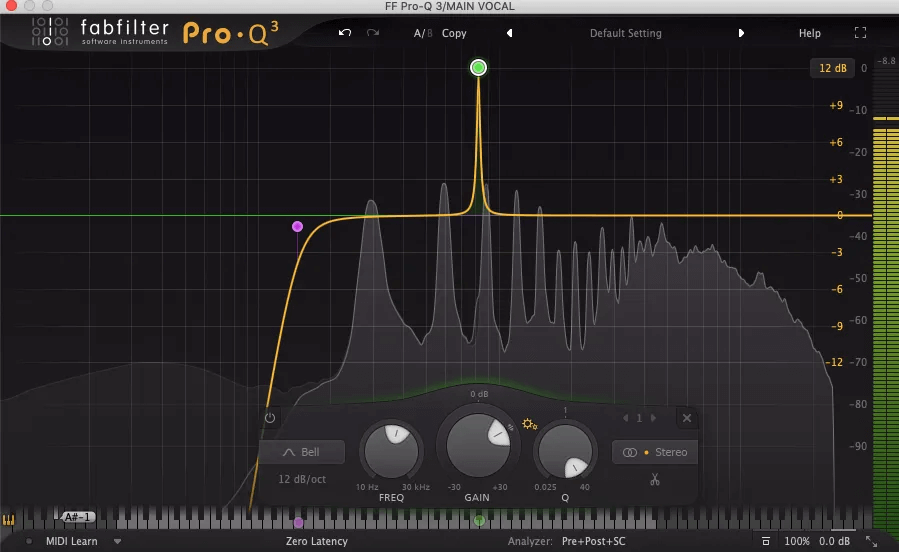
• EQ-ing:
It’s better to look for obvious resonant peaks in the top end frequencies. We can sweep through the sound using the method described above to see if there are any easy wins. To avoid losing too much information, use a tight Q setting
For starters, this EQ cheat sheet can be helpful. However, it’s not always the same frequencies; use this more as a good starting point.
EQ Vocal Cheat Sheet – Source – TalkinMusic.com • De-essing :
Well, A de-esser is essentially a dynamic EQ / multiband compressor.
And since Its function is to identify top end or harsh frequencies it will reduce the volume of the band if the frequency it is aimed at a certain threshold
Thus, it’s commonly used to reduce the harsh notes called ‘Sibilants.’
By the way, Avoid removing too many dBs with the de-esser as this can cause the vocals to sound strange, giving the impression of a lisp.
• Dynamic EQ / Multiband Compression :
Similarly to the de-esser, a multiband compressor can offer great assistance with controlling harsh frequencies.
In the example below, the band is set to be focusing on the 3-10Khz range and The benefit of this over a de-esser is the level of control it offers.
Further, it’s possible to set the release time to work in tandem with the tempo of the song, or the speed of the vocal and the ability to control the attack time to fit the song.
The Multiband, like a De-Esser, reacts to particular frequencies that exceed the threshold
Compress Vocals
What is vocal compression?
Compression operates as a controlling device for the various dynamics of an instrument. Using a compressor, you can set up a threshold for the peak height of a signal’s amplitude.
This means that any signal that extends above that threshold will be squished down. Engineers and producers utilize compressors on drums, for instance, due to their large dynamic range, or potential loudness.
Vocal compression simply refers to the compression applied on a vocal track.
What Is A Compressor?
A compressor is a software (or hardware) plug-in that adjusts dynamics, it turns down the loud sounds and turns up the quiet ones.
This may be immensely effective in smoothing out audio that fluctuates volume lots, makes a guitar performance even or helping compress a vocal recording.
• Compressor Setup
The compressor has a few features that are worth exploring, particularly when wanting to learn how to compress vocals.
So..
- Threshold: The moment in signal volume when compression starts
- Attack: is related to speed or how long it takes for the compressor to start working.
Tip: The attack setting on a compressor is critical (Slowing them down allow for the transient to come through before being clamped down)
- Release: The speed it takes the compressor to return to its normal state (it is based mainly on the tempo of the song or the speed of performance)
• Compressing Vocals
Mastering vocal compression takes time and there are no specific methods for it but here a couple of TIPS to help you do it :
- First of all, try to level out some of the vocal levels with clip gain or a comparable method.
- Use a low ratio of around 3 or 4:1.
- Start lowering the threshold until you achieve some gain reduction
- Set release a fast release
- Set the attack as fast as possible then gently scale it down

Working with this initial degree of compression is a balancing act and will need a little adjusting.
Enter the second Compressor.2 Better Than 1
The first compressor in the chain is excellent to capturing and controlling any surges in gain. Enter compressor number 2 comes !!
By applying a slower, gentler compressor after the rapid one we’re able to manage the voice and smooth things out even more. A compressor like the LA-2A is perfect for this because to it’s shorter attack times and gentler approach to compression.ADD FX
In any song that incorporates voice, the vocals take front and centre. The words and sounds of the vocalist bind together the other components of the musical landscape.
Every voice is distinctive, with a separate note and a dynamic range, and in a recording, context needs a vast array of ways to vocal editing and changes.
The possibilities for vocal effects are vast. They include reverb, delay, choir, distortion, EQ, pitch shift, and echo.• Reverb
Picking the perfect reverb for the project might be challenging; that’s why we will just go for the stock Ableton one This easy to use plugin lets you achieve the reverb sound you are looking for without requiring a degree in reverb science.
The secret to a nice reverb sound is the use of EQ, decay time and pre-delay.. By adjusting these 3 factors, we should start to make a reverb that fits well around our vocal, leaving crispness but gaining 3D space.
By EQ’ing the input and the reverb’s output, we can prevent those unpleasant reverb spikes from occurring, making the singing sound unnatural and amateur.
• Spring Reverb
This reverb is utilized for providing more character and depth. Many of the classic records we know and love employed a mixture of plates & springs so we’ll do the same.
Ableton’s convolution spring incorporates recordings of genuine old spring units, offering the ideal instrument for generating those distinctive, vintage tones.
An important component of making your reverb to suit is the usage of EQ. I feel EQ is one of the most important tools for learning how to apply FX to vocals.
Other Articles:
– 12 Best Free VST Plugins 2021
– What Is a DAW?(EVERYTHING YOU NEED TO KNOW)
– 10 Free Piano VST Plugins You Can Download Now
– 12 Best Free VST Plugins 2021 (With Download Link)
– 10 Best VST Reverb Plugins You should Use in 2021
– VST Plugins used by Top Producers & Professionals